DATE AND TIME: 03/09/2015
LOCATION: Chandler 260 lab, Columbia University
SUBJECT: Plaster casting flowers
Flower moulding recipes from the manuscript
From the plaster casting recipes that Jef sent over to us before class, I decided to mould a carnation, the recipe for which is as follows:
English translation:
<title id="p159v_a2">Carnation</title>
<ab id="p159v_b2">Mold a carnation like a rose, marigold, and all other flowers as discussed, that is to say cast the flowers in one mold, and the leaves in two parts in order to solder them onto the flower, this is the better way. But you could mold the flower and the leaves together in one single closed mold. I tried one which came out well from the mold. But the sand must be very thin, and you must blow very strongly.</ab>
French original:
<title id="p159v_a2"> Oeillet</title>
<ab id="p159v_b2"> Il se moule co{mm}e la rose soulcy & toutes aultres<lb/>
fleurs ainsy que dict est scavoir les fleurs a<lb/> moule entier & toutes les foeilles
si tu veulx<lb/> a deulx moicties pour les raporter par souldure<lb/> pour la voye
plus asseuree Combien que tu les<lb/> pourroys mouler ensemble en moule clos
Jen ay<lb/> gecte un qui est fort bien venu Mays il fault le sable fort<lb/> cler &
soufler fort</ab>
As the carnation 'recipe' doesn't really give directions as to the moulding process beyond saying that it is identical to that used for moulding roses and marigolds. Therefore I used the following recipes from the manuscript (f.129r, f.154v, and f.155r) for moulding roses in order to construct a protocol for the carnation moulding:
<title id="p129r_a4">
Molded roses </title>
<ab id="p129r_b4">
Roses are molded with difficulty because of their leafs which are very delicate, double and soft. To obviate
these disadvantages rub it with wheat oil which is very dessicant, once dried the oil stiffens the leafs which
will withstand soaked sand. Do the same thing with flies, pansies, and other delicate things like capers
</ab>
<title id="p154v_a4">
Strengthening flowers and delicate things </title>
<ab id="p154v_b4">
One doesn't use wheat oil to strengthen flowers and herbages, but one uses melted butter. Cover the back
of the leafs of flowers, e.g. : roses, pansies with a fine coat of melted butter, do the same with flowers which
need to be strengthened. One uses wheat oil to strengthen the feet of a fly or of any small animal. </ab>
<title id="p155r_a1">Moulding a rose</title>
<ab id="p155r_b1">Because of the little branches of the rose bush, which are around the flower, are
sometimes very spread out, they would demand too big of a mold. We make and cast them separately, the
rose and the rosebuds separately as well. And then one brings them together, soldering the little branches
and leaves of the rose bush to the stem of the rose, on which you will have purposefully left bits of the small
branches. Put your petal or rose as low as you can in your mould, because sand will always bring it up or
raise it. You can also mould several petals together, arranged one on top of the other, separating them
some thread. And for the look of the rose you can give a thin layer of melted butter on the back of the
petals, but only on the outside petals, not the inside petals, to stiffen them and give them the strength to
withstand, so that the wet sand does not stretch or spread them out more than necessary. You can also
mold well the leaves of a rosebush, strawberry plant and similar things, that are flat and can be flattened
without being spoiled. For two castings[982], to open your mould, when it has been reheated and then clean
the ashes out, make some vents, and [you will be able to do] several casts. This is the easiest way and you
can also do the other. And with little vents of wax that has been adapted and joined from petal to petal, you
can make casts. You can even make a little vent of wax from the back of the first petal, which will join up
with the main cast. All of this will facilitate the casting process. The main thing is to let your reheated moulds
cool down rather than cleaning them and blowing inside them to make the wax come out, because when the
mold is hot, the ash almost attaches itself to it. But when it is cold it, it detaches[983] and leaves with air
draft or when one draw in one's breath through the small opening.
<note id="p155r_c1a">You can also give a little thickness at the ends of the stems that are holding up the
petals, by lightly oiling them underneath with melted butter, because the petals are big and weigh heavily,
and the stem made of lead or tin will not have enough strength [to hold it].</note>
<note id="p155r_c1b">I would be of the opinion to mold the rose on its own with a bit of its stem close to its
bud, and then to join the rose to a longer one [a stem] made of glazed brass, because the rose bloom is very
big and heavy.</note>
<note id="p155r_c1c">Moisten your rose with spirits before placing it in the clay. Do not forget to oil the wax
cast. And when you have thrown in your wet sand, blow heavily, until it begins to set. The rose came out
well. But because the sand was mixed within the petals, soak your work in water for a long time so that
when you shake it in the water, the earth comes off.</note>
Preparing the flowers and moulds
On Monday, Caroline brought a selection of flowers from a nearby store to class: roses (which Caroline had chosen to mould), carnations (my choice), and a third flower, which we later discovered was called a wax flower. This flower was much smaller, and we were intrigued as to the kind of cast it would produce. We decided to mould all three types of flower, using different strengthening agents specified in the manuscript for each one. For the carnation, we applied heated wheat oil; for the rose, we used unheated wheat oil, and for the wax flower, we applied melted butter. There wasn't a huge amount of rationale behind which flowers got which strengthening agents, except for the wax flower: as it was already quite rigid, we decided to coat it in melted butter, which we thought would have less of a strengthening effect than the wheat oil.
Before we did anything, we had to puzzle out how the moulds were actually going to be constructed! Andrew Lacey was very helpful in this regard, showing us that we needed to construct a clay base for our moulds, then implanting our flowers in wax cones which would then be embedded into the clay base. Caroline got working on constructing the clay bases while I applied the strengthening agents to each flower with a paintbrush. Although the manuscript states that the wheat oil/butter need only be applied to the underside of the petals (presumably because they come into most contact with the plaster), I was a little concerned about the fragility of the flowers (particularly the carnation, with its intricate petals), so I decided to apply the agents all over each flower.
When I finished applying the strengthening agents, I brought the flowers back to Caroline, who had finished the clay bases, and we embedded the flowers into the wax cones, which we then pressed into the bases.
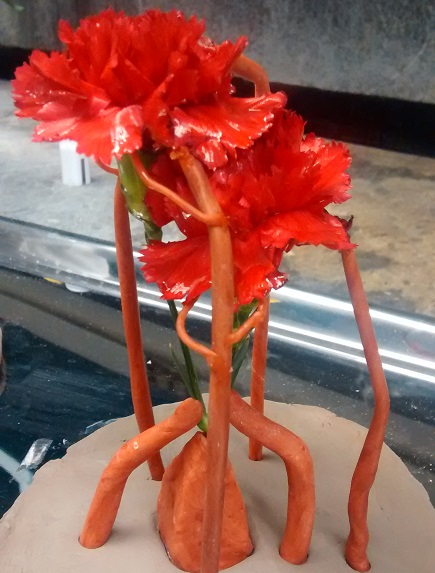
After this, we created a number of very thin wax sprues, which connected to the petals and other frail/thin parts of the flowers (see images below). Using a wax pen, we fused the sprues with the flowers, which proved to be tricky work at times, particularly with the carnation's intricate petals. However, we soon completed the sprue framework.
Following this, we worked on building up the clay walls around our bases embedded with flowers. We were careful to make sure that there was a fair amount of space (~2 inches) between the top of the flower and the top of the mould, to ensure that the mould would be secure. However, we did find that it could be difficult to get the clay walls to the necessary thickness: as a result, I took some extra clay and used it to reinforce the first wall that I had built around the clay base. (NB: this was such a pleasant tactile experience!) Even then, Caroline and I applied a layer of tape to the walls of each of our three moulds as extra strengthening measure.
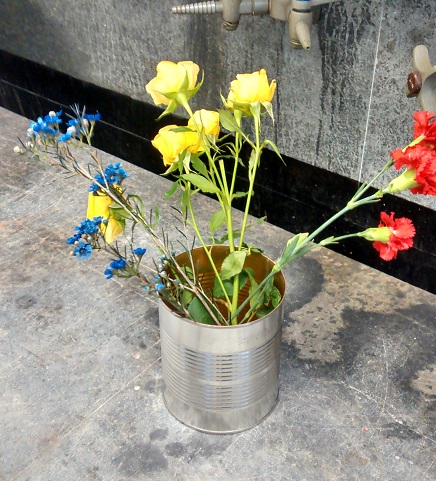 |
| Our flowers, ready for casting |
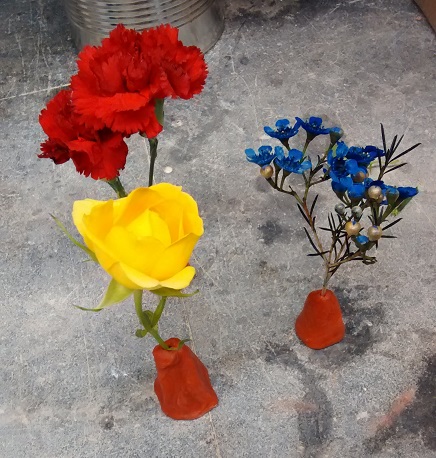 |
| Flowers embedded in wax |
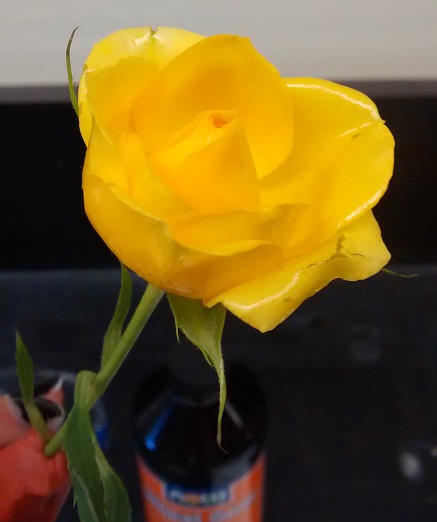 |
| The rose, painted with unheated wheat oil |
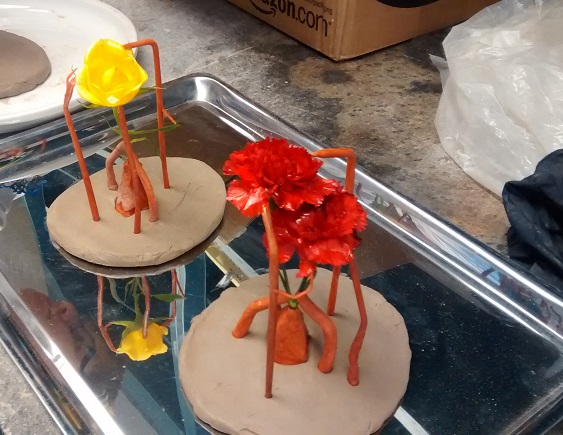 |
| The rose and carnation, on clay bases and surrounded by wax armature |
 |
| Close-up of the carnation in wax sprue framework |
Making and pouring the plaster
In order to determine an appropriate plaster recipe for our cast, we looked to the manuscript. The following recipes all seemed relevant:
<ab id="p106r_b2b"> For sand for molding flowers and leaves & other delicate things, mix in raw plaster, crushed brick and stone alum.</ab>
<title id="p107r_a1">Catching lizards and snakes</title>
<ab id="p107r_b2a"The sand mixture is made of two thirds of ground plaster, reheated as it is said before, and of one part of reddened tiles which are finely ground afterwards. Use also stone alum, half of the quantity of the tiles[689]. Use two full pots of plaster, one pot of tile and half a pot of stone alum. Do not use too much stone alum because that binds the sand, and allow sand to withstand fire without cracking or breaking.[690] Without it [stone alum] sand would not withstand fire, you can use it for all kind of metal, but for gold add a bigger quantity of stone alum, add also crocum ferri, because they [these filings] attract
title id="p121v_a1">Casting in silver</title>
<ab id="p121v_b1">You should place the animals as said and similarly compose the sand by taking four measures of plaster, two measures of annealed bricks, and one measure of annealed stone alum. Mix it
well, and once it is ready and you wish to mold, take three measures from the sort of dish used by peasants to eat. Add pure annealed stone alum that has been ground in a mortar to this sand, as much as you will be able to grab with your four fingers and thumb or with a small joincte[802]. Then, mix well and dillute [this mixture] with a bit of sal armoniac and the rest of common water. And stir it with your palette[803] so that it all becomes like a thick sauce or light mustard. Once you have applied spirits with a brush on the animal, cast and swell, and hit the table for the mold to shake[804][805] and proceed similarly as the others. Do not forget to put crocum because it prevents mold from breaking and it is approriate with every metal.</ab>
It looked like a plaster recipe that used 4 parts plaster, 2 parts pulverised brick, and one part stone alum would be appropriate. However, there was no stone alum available in the alum; still, following Pamela's advice, we decided to make the plaster without the addition of the alum, simply using 2 parts plaster to 1 part ground brick.
Caroline made up the first batch of plaster. Andrew Lacey had already created the 2:1 mixture of plaster and brick, so we began by taking a rubber bowl filled with water, and adding two teaspoons of sal ammoniac. After that, Caroline added the plaster mixture bit by bit, mixing it with her hands. After the plaster was added to the water, Caroline also added a scoop of iron filings to the mixture. (Note: most of these measurements were done by eye, rather than according to strict ratios). Caroline seemed to find that the mixture remained very thin, even after the addition of all the 'dry' elements: however, after a few minutes the mixture began to thicken very quickly, and we rushed to pour the plaster into the moulds. The amount of plaster we had made was enough to fill one full mould and half of a second mould. Andrew Lacey suggested that we score the plaster that was in the second mould as it dried, so that the next batch of plaster to be added to the mould would integrate with the first, rather than sitting on top of it and creating two separate moulds. Caroline's plaster dried and hardened particularly fast after pouring.
I then made the second batch of plaster, for filling the second half of the second mould and the entirety of the third. I followed the same recipe/routine as Caroline, and also found that the mixture felt very thin at first (there was also a lot of grittiness in the bottom of the bowl, though Andrew said that this was to be expected). Because of our experience with the first plaster mixture suddenly thickening very quickly, we decided to pour the plaster slightly earlier than before.
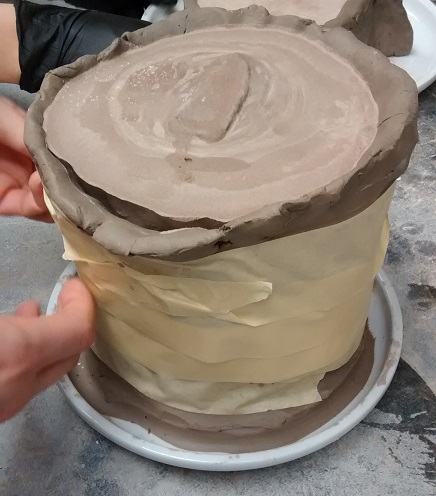
After pouring the second batch, we allowed the plaster mixture to harden for 15 minutes before removing the clay walls and bases (a simple process). We then carved our initials in the sides of the moulds for identification, and then placed them in a fume hood to dry out before firing in a kiln later.
 |
| One of our finished moulds, filled with dry plaster and ready for the removal of its clay walls |
ASPECTS TO KEEP IN MIND WHEN MAKING FIELD NOTES
- note time
- note (changing) conditions in the room
- note temperature of ingredients to be processed (e.g. cold from fridge, room temperature etc.)
- document materials, equipment, and processes in writing and with photographs
- notes on ingredients and equipment (where did you get them? issues of authenticity)
- note precisely the scales and temperatures you used (please indicate how you interpreted imprecise recipe instruction)
- see also our informal template for recipe reconstructions