
Table of Contents
Dark red text has been formatted as certain heading types. To ensure the table of contents is rendered correctly, make sure any edits to these fields does not change their heading type. |
Name: Celine Camps
Date and Time:
Location: Private apartment, 405 West 118th Street.
Subject: Setting aim/objectives and setting up the starter
Aim/Objectives:
Practice and experiment with making molds of bread based on recipes from BnF Ms. Fr. 640.
Become familiar with interpreting early modern recipes (such as those in the BnF Ms. Fr 640) and learn how to document reconstructions in written form.
Learn how to use a variety of resources and tools to find and select early modern recipes.
Reflect on materials and their nature.
I chose not to put my starter’s kit in the refrigerator, given that early modern practitioners also did not have the luxury of one and had to resort to other ways to keep their sourdough cold (if desired). I therefore decided to keep it in on an open shelved closet (see fig. 2) adjacent to the kitchen but secluded from its daily activities (and thus from the heat produced during them).
| Image URL: |
|---|
|
| Image URL: |
|---|
 |
Name: Celine Camps
Date and Time:
Location: Private apartment, 405 West 118th Street.
Subject: Finding recipes on casting in bread molds in BnF Ms. Fr. 640
I used the consolidated TL file in the Pdfs of Manuscript folder on the Google Drive to search for the recipe entries on casting in bread molds in the manuscript.
I used the search option to find all hits for the word ‘bread’.
There were various uses of bread throughout the manuscript. See the list below.
USES OF ‘BREAD’ IN MS. FR. 640
Bread is referred to in about 20 entries.
| Folio Number | Recipe entry title | Quotation | Recipe category (provisional) | Comment |
|---|---|---|---|---|
| 4v | Black varnish for sword guard, bands for trunks, &c. | “some also add <m>bread crusts</m></add>” | Color/varnish | Bread used as ingredient/material. |
| 29r | Stucco for molding | “And knead it as if you wanted to make <m>bread</m>” “you perceive that it has enough body & is as firm as <m>bread dough</m>” |
Molding | Bread is used as a comparative material here, but not actually used in recipe Use of bread comparison with a reference to texture/consistency/firmness/feel rather than for reasons of taste. Refers to sensory understanding of material. The fact that this is not elaborated upon, makes it reasonable to believe the author assumed the reader to be familiar with the ‘feel’ of bread dough and the process of making it. |
| 37r | Medicine for the stomach which warms it <x>stomach</x> and unstops the liver</head> | “take once a week on a piece of <m>bread</m> dipped in <m>wine</m>.” |
Medicinal | Serves as a vehicle for ‘carrying’ another ingredient. Alludes to its texture’s ability to absorb fluids and contain them? How would this relate to a liquid like wax or sulfur poured in bread molds? |
| 41r | Sand | “Guard against <m>bread</m> falling into your sand because it makes it very porous.” |
Casting | Undesired material/ingredient. Nature of bread having detrimental effect |
| 41r | Ducks | “to which are added crumbled <m>bread</m>” | Cultivation? | Ingredient/material in other recipe |
| 48r | Excellent Mustard | “Dry some <m>bread</m> in an oven” | Culinary/cooking | Ingredient/material in other recipe |
| 50v | Little birds | “crush <m>almonds</m> with very fine <m>breadcrumbs</m>” | Cultivation? | Ingredient/material in other recipe |
| 51r | Cutters of printing plates | “add <m>garlic</m> cloves and <m>bread</m> crusts to skim them” | ? | Ingredient/material in other recipe |
| 54v | To lead a horse | “give it sweet bread” | Cultivation? | Ingredient/material in other recipe |
| 56v | Painter | “one grinds the <m>inside of a large loaf of bread</m> on it to remove the fattiness from the <tl><m>marble</m></tl>.</ab>” |
Color/varnish | Tool Material properties of bread -- ability to absorb -- are used remove undesired substances. |
| 66v | Preventing the swelling of breasts <del>d</del> <add>or to make those that became too large smaller</add> | “Take large <m>loafs of bread</m>” “after having laid on the hot <m>bread</m>, which is soggy & makes one sweat “ |
? | Material/ingredient |
| 74r | For making varnish | “mixed with a <m>crust of bread</m>” | Color/varnish | Material/Ingredient I suspect the bread will give consistency to the mixture (this would require reconstructing). |
| 84r | Impromptu mask | “<tmp>after you have taken the bread out</tmp>” | Molding? | Not sure about this one -- more close reading required |
| 114r | Second Cast | “Then strongly separate the molds as if you wanted to tear <m>bread</m> apart” | Casting | Bread is used as a comparative material here, but not actually used in recipe Use of bread comparison with a reference to texture/consistency/firmness/feel rather than for reasons of taste. Refers to sensory understanding or ‘feel’ of material. |
| 129v | Animals oven dried for a long time | “then dry them into an oven as hot as when <m>bread</m> has been taken out.” |
Molding | Bread is used as a comparative material here, but not actually used in recipe Requires the use the senses (using touch to feel the temperature of bread and using that ‘sensory memory’ as a referent in other recipes) The author appears to have been using his body and senses to understand materials and their qualities rather than tools. More than just a lack of available tools? Or did artisans place more trust in their body then we would nowadays? |
| 130r | Drying animals in an oven | “One may finish to dry the animal by placing it in an oven once the bread has been taken off” |
Molding? | Bread is used as a comparative material here, but not actually used in recipe Preparation of bread used to check whether oven is at the right temperature? Making use of experience in other making processes as a way to understand new ones? |
| 140v_1 | To cast in sulfur | “arrange the pith of <m>bread</m> “ |
Casting | Used as a material/ingredient and tool to make casting molds. Probably related to the texture and natural properties of bread. Reflect on this later, after reconstruction |
| 140v_2 | Molding and shrinking a large shape | “Mold it with the pith of bread just out of the oven,” “lengthening out or enlarging the imprinted bread” “The <m>bread</m> straight from the oven is best.” “You can cast <m>sulfur</m> without letting the imprint on the <m>bread</m> dry” |
Casting | Used as a material/ingredient and tool to make casting molds. Probably related to the texture and natural properties of bread. Reflect on this later, after reconstruction |
| 156r | Quickly molding and reducing a relief to a hollow <x>mold</x> | “make the first impression and the first hollow out of the inside portion of the <m>bread</m> loaf,” |
Casting | Used as a material/ingredient and tool to make casting molds. Probably related to the texture and natural properties of bread. Reflect on this later, after reconstruction |
| 161r | Preparing sand for box molds | “Place them in the oven pots of <pro>tile-makers,</pro> in a bread oven,” |
Casting | Used as a way to indicate specific tool |
RECIPES FOR BREAD MOLDING IN BNF MS. 640:
Folio 140v_1
Transcription Normalized French (TCN)
<div>
<id>p140v_1</id>
<head>
Pour gecter en <m>soufre</m></head>
<ab>
Pour gecter nettement en <m>soufre</m>, acoustre la <m>miette de<lb/>
pain</m> soubs le brasier comme tu sçais. Moules en ce que<lb/>
tu veulx & laisse seicher & tu auras ton ouvrage fort net.</ab>
<ab>
<margin>left-top</margin>
Essaye le <m>soufre</m>,<lb/>
passé par la <m>cire</m><lb/>
fondue, pource qu'il<lb/>
ne s'enflamme plus<lb/>
& ne faict plus d'oeillets.</ab>
</div>
Translation (TL)
<id>p140v_1</id>
<head>To cast in <m>sulfur</m></head>
<ab>
To cast neatly in <m>sulfur</m>, arrange the pith of <m>bread</m> under the brazier, as you know. Mold whatever you want into it & let it dry & you will have very
neat work.</ab>
<ab>
<margin>left-top</margin>
Try <m>sulfur</m> passed through melted <m>wax</m>, because it will no longer ignite & and make eyelets.</ab>
</div>
Folio 140v_2
Transcription Normalized French (TCN)
<div>
<id>p140v_2</id>
<head>
Mouler et rapetisser une grande<lb/>
figure</head>
<ab>Moule le avecq <m>mie de pain</m> venant du <tl>four</tl> ou co<exp>mm</exp>e la<lb/>susdicte, & en se seichant il s'apetissera, & par consequent<lb/>
la medaille que tu y gecteras. Tu <del>luy></del> peulx, par ce<lb/>
moyen, en allongeant ou eslargisseant la <m>miette</m> emprainte,<lb/>
varier la figure & d'un visage en fayre plusieurs<lb/>
tous divers. Le <m>pain</m> venant du <tl>four</tl> est meilleur. Et<lb/>
celuy qui est deulx fois recuit se retire dadvantage. Tu<lb/>
peulx gecter le <m>soufre</m> sans laisser seicher l'empraincte<lb/>
du <m>pain</m>, si tu la veulx mouler aussy grande qu’elle est.<lb/>
Mays si tu la veulx laisser apetisser, fais la seicher<lb/>
ou plus ou moings.</ab>
</div>
Translation (TL)
<div>
<id>p140v_2</id>
<head>Molding and shrinking a large shape</head>
<ab>
Mold it with the pith of bread just out of the oven, or like that aforementioned, & in drying out it will shrink & consequently so will the medal that you will cast. By these
means - lengthening out or enlarging the imprinted bread - you can vary the shape & from one face make several different ones. The <m>bread</m> straight from the
oven is best. And the one which has been heated twice contracts more. You can cast <m>sulfur</m> without letting the imprint on the <m>bread</m> dry, if you want to
cast it as large as it is. But, if you want to let it shrink, let it dry to a greater or lesser extent.</ab>
</div>
Folio 156r_1
Transcription Normalized French (TCN)
<div>
<id>p156r_1</id>
<head>Mouler prompteme<exp>n</exp>t et reduire un<lb/>
cave en relief</head>
<ab>Tu peulx empraindre de <m>cire colorée</m> le relief d'une<lb/>
medaille, & tu auras un cave dans lequel tu pourras gecter<lb/>
en noyau un relief <add>de ton sable</add>, sur lequel tu feras un cave de <m>plomb</m><lb/>
ou d'<m>estain,</m> dans lequel tu gecteras un relief de <m>cire</m>.<lb/>
Et puys, sur ceste <m>cire</m>, tu feras ton <tl>moule</tl> en noyau cave<lb/>
pour y gecter le relief d'<m>or</m> & d'<m>argent</m> ou tel aultre<lb/>
<m>metal</m> qu'il te plaira. Mays pour advancer besoigne,<lb/>
si tu as haste, fais le premier empraint & cave de <m>mie de<lb/>
pain</m> preparée co<exp>mm</exp>e tu sçais, qui moulera fort net. Et là<lb/>
dedans gectes y de la <m>cire fondue</m>, qui te rendra un beau<lb/>
relief sur lequel tu feras ton noyau.</ab>
</div>
Translation (TL)
<div>
<id>p156r_1</id>
<head>Quickly molding and reducing a relief[a] to a hollow <x>mold</x></head>
<ab>Make an impression in colored wax of the relief of your medal. And you will get a hollow mold, in which you can cast en noyau[b] a relief in sand. In this, you will
cast your hollow in lead or tin. In this, you you will cast your wax relief. And then on this <m>wax</m>, you will make your hollow moule en noyau, in order to cast in it
the relief in <m>gold</m> or <m>silver</m> or any other metal you would like. But to make this process go faster, if you are in a hurry, make the first impression and the
first hollow out of the inside portion of the <m>bread</m> loaf[c], prepared as you know, and which will cast neatly. And inside this, cast in the melted <m>wax</m>
which will give you a nice relief on which you can make your noyau.</ab>
</div>
Name: Celine Camps
Date and Time:
Location: Private apartment, 405 West 118th Street, 10027 New York.
Subject: Searching for how to feed starter and early modern bread-making recipes
Feeding starter:
I found instructions for feeding my starter’s kit on the website ‘Cultures for Health’:
https://www.culturesforhealth.com/learn/sourdough/how-to-feed-sourdough-starter/
REFLECTIONS:
I did not have time to start with the bread-making assignment until about four days after we were given the starter’s kit. The fact that my kit was left untouched (and unrefrigerated) for a number of days made me wonder if this would have any effect on the outcome of the reconstruction.
Searching for Early Modern recipes:
I started by using the Recipes’ Project website to look for possible reference to bread making: https://recipes.hypotheses.org/
Because I was unsuccessful, I decided to use the CU library tool developed by Meredith Levin.
After having consulted the ‘Cooking’ tab, I used the ‘Finding Recipes’ - ‘Online Databases with Recipes’ option. I used two different databases from that list:
Early European Books: printed sources to 1700:
I struggled with getting hits and therefore moved on to try:
I first searched for recipes with ‘bread’ ranging from 1500-1700. This gave me a huge list of hits that contained a wide variety of books of mainly religious meaning.
I therefore chose to use ‘cooking’ and subsequently ‘cook’ as a keyword and found the following books:
Mrs. A. M. - Cookery refin'd. Or, The lady, gentlewoman and servant-maids useful companion (1656)
Browsing through it, however, makes clear the book is only about Meat, Fish and Poultry. No references to bread making.
Mounsieur [sic] Marnètte - The Perfect Cook (1656)
The word bread is used 96 times throughout the book. Although the book often mentions ‘household bread’, it is always used as an ingredient or tool in the context of other recipes. No references to making bread.
Hannah Woolley - The accomplisht ladys delight in preserving, physick and cookery (1675)
Contains recipes for making ginger-bread and brisket bread, but no ‘plain’ bread (although I am now wondering to what extent this matters for molding)
Robert May - The accomplisht cook, or The art and mystery of cookery (1665)
Contains a recipe on ‘To make French Bread the best way’. This book uses the word
‘bread’ 372 times. Yet there are only 2 or 3 recipes for actually making bread. I chose to make “French Bread the best way”.
| Image URL: |
|---|
 |
Transcription:
Take a gallon of fine flour, and a pint of good new ale barn or yeast, and put it to the floor, with the whites of six new laid eggs well beaten in a dish, and mixt with the barn in the middle of the flour, also three spoonfuls of fine salt, then warm some milk and fair water, and put to it, and make it up pretty stiff, being well wrought and worked up, cover it in a boul or tray with a warm cloth till your be hot, then make it up either in rouls, or fashion it in little wooden dishes and bake it, being baked in a quick oven, chip it hot.
REFLECTIONS:
Search tool: Using the database search tool was extremely useful, but it does require practice to know which keywords best to use and how to employ them in such a way that allows you to narrow your search result to a searchable amount of hits (as opposed to 40 pages).
Use of bread in recipes: It is both as a result of my browsing through the BnF. Ms. Fr. 640 and the recipe books online, that I learned bread was a commonly used ingredient/material and tool in the production of other recipes. There are numerous instructions to ‘cover with bread’, ‘put on bread’, ‘mix with grated bread’, ‘use white bread’, etc. But little to no recipes for actually making bread. My guess is that it is precisely because bread was so frequently used that authors of recipe books presumably did not consider it worthy of documenting -- unless they knew of an excellent way to prepare it (and could possibly distinguish themselves from other authors).
Later added comment: In her annotation ‘Pain, Ostie, Rostie Bread in Early Modern Europe’ of 2016, Emma Marie Le Pouésard has also pointed to the important role of bakers’ guilds in the production of bread. This might also explain why there are few recipes on how to make bread in early modern recipe books.
Name: Celine Camps
Date and Time:
Location: Apple Tree Market, 1225 Amsterdam Avenue, 10027 New York.
Subject: Buying ingredients for feeding the sourdough and making bread
Purchased ingredients at my local grocer:
| Ingredients for feeding starter | What I purchased/used |
|---|---|
| Sourdough Starter’s kit | Sourdough Starter’s kit, from the M&K team |
| Flower |
|
| Water | Lukewarm tap water |
| Tools for feeding the starter | What I purchased/used |
|---|---|
| Bowl or plastic box | I used a plastic bowl that I had at home |
| Spoon (or something to stir with) | Wooden spoon |
| Cloth or lit (for covering the dough) | Cotton cloth |
| Scale or measuring cup (for measuring the amount of water and flower) |
|
| Ingredients for bread making | What I purchased/used |
|---|---|
| Gallon of fine flower |
|
| A pint of good new ale barn or yeast | Sourdough Starter’s kit, from the M&K team |
| Whites of 6 new laid eggs well beaten in a dish | 6 |
| 3 spoonfuls of fine salt | Plain kitchen salt (not sure which brand) |
| Some milk | Low temperature pasteurized |
| Fair water | Tap water |
| Tools for bread making | What I purchased/used |
|---|---|
| Bowl or plastic box | I used a plastic bowl that I had at home |
| Spoon | Teaspoon |
| Something to “beat” the egg whites with | Whiskers |
| Cloth or lit (for covering the dough) | Cotton cloth |
| Scale or measuring cup (for measuring the amount of water and flower) |
|
| Dish |
|
| Something to warm the milk & water in |
|
| Oven |
|
REFLECTIONS:
One of the limitations of selecting materials was the amount of time I had. Although I wanted to use authentic materials and tools, I found it more important to be able to experiment with making the molds. I also tried to keep objective 2 (‘Become familiar with interpreting early modern recipes’) in mind and see this as a way to practice reading early modern recipes.
I assumed that milk at that time would not be pasteurized so settled for the least pasteurized milk I could find in the store.
I am not sure as to how big spoons were at that time, but I settled for a teaspoon.
| Image URL: |
|---|
 |
Name: Celine Camps
Date and Time:
Location: Private apartment, 405 West 118th Street, 10027 New York.
Subject: Feeding starter
11:02 PM I mixed half a cup of starter with half a cup of water and about 1 cup of flower. I stirred it all and made sure no flour was stuck on the bottom of the bowl or on the sides (see image below). I covered it with a cloth and put it in the same uncovered closet as the sourdough starter’s kit.
11:15 PM Set my sourdough to rest overnight and will refeed it tomorrow morning.
REFLECTIONS:
I found it somewhat difficult to know how much starter to use given that I would like to make at least two loaves. I might have been too frugal with my starter.
| Image URL: |
|---|
 |
Name: Celine Camps
Date and Time:
Location: Private apartment, 405 West 118th Street, 10027 New York.
Subject: Checking on and refeeding sourdough mix
Sourdough has risen a bit but is not bubbling yet (see image) as I had hoped. Only two small bubbles have appeared on the surface. There might be various reasons for this:
I didn’t put enough starter in the mix and I was too frugal with it (which was already one of my concerns)
It became active overnight – I didn’t see it – and then settled down again because it wasn’t fed.
The temperature in my room and nature of my sourdough is simply different from the one in the instruction video and I need to let it sit longer.
Leaving my starter unrefrigerated for a fews days has ‘deactivated’ (for lack of a better word) the bacteria in the starter.
I decided to move the sourdough mix to a slightly warmer location (in the kitchen cupboard) for about four hours and see if it would become more active.
If not, the internet informs me that I can mix in a little more starter. For now, I will try to be patient.
I have also moved the starter to the fridge; thinking about the objectives, I reckon it is more important to be able to experiment with making the molds than have the process of preparing the starter be as authentic as possible.
REFLECTIONS:
My experience made me aware of the messiness, open-endedness and situatedness of craft practices. It illustrated to me that reconstructions (and processes of making more generally), differ fundamentally from reading a set of written instructions, in the sense that knowing how to proceed is not merely a matter of following an a priori laid out plan (no matter how well-organised and thought out), but rather, depends on decisions, solutions and adjustments that have to be made impromptu, in situ, in the face of (sometimes) unforeseen problems and thus in the unfolding of the process itself. This requires an empirical mode of reasoning.
| Image URL: |
|---|
 |
Name: Celine Camps
Date and Time:
Location: Private apartment, 405 West 118th Street, 10027 New York.
Subject: Checking on and refeeding sourdough mix
The sourdough mix has risen a bit and more bubbles have appeared (see figure below). I am not sure what the cause of this change is (could be a variety of factors).
I refed it using the same amounts: half a cup of water, half a cup of starter and a bit less than 1 cup of flower.
I placed it back in the cupboard and stored the remaining starter back in the fridge.
| Image URL: |
|---|
 |
Name: Celine Camps
Date and Time:
Location: Private apartment, 405 West 118th Street, 10027 New York.
Subject: Checking on and refeeding sourdough mix
The sourdough mix has risen a bit, but still not as many bubbles as I had expected (I might just have to readjust my expectations).
Name: Celine Camps
Date and Time:
Location: Private apartment, 405 West 118th Street, 10027 New York.
Subject: Checking on and refeeding sourdough mix
No big bubbles, but I am starting to think that may not be necessary (or maybe this is wishful thinking).
Fed my mix for the last time and will leave it to rest overnight. Bread making time tomorrow.
REFLECTIONS:
I have begun to realize there is a benefit of choosing a glass or see through box/bowl when making your starter: the ability of sight and seeing the texture of the mixture through the glass (knowing if there are bubbles inside). On the other hand, I am also thinking of Pamela Smith’s and Tianna Uchacz’ comment about how we tend to rely a lot on sight, whereas early modern practitioners would also employ other senses to know if, for example, water was boiling or materials would be ready for use in a subsequent step of the making process.
Name: Celine Camps
Date and Time:
Location: Private apartment, 405 West 118th Street, 10027 New York.
Subject: Checking on the sourdough mix
Bubbles! We’ve got bubbles! I can now start making the dough.
| Image URL: |
|---|
 |
Name: Celine Camps
Date and Time:
Location: Private apartment, 405 West 118th Street, 10027 New York.
Subject: Fixing oven crisis
My oven just broke. My roommate and I used it a few days ago and it seemed to be working fine. Although I haven’t prepared the dough yet and could wait till maintenance has fixed my oven, I would prefer making the bread today, so I can practice multiple times.
I am reminding myself that this is part of doing experiments and to see it as a way of gaining more insight into the nature of experiments (and its processes) and craft practices. See also my reflections of 2018.09.22 of 7:30 AM re the messiness and trial and error character of craft practices (and, I would add, of the production of knowledge and science more generally).
In other words: adjust your plan to the situation and proceed.
I thus went on a search for a functioning oven.
Name: Celine Camps and Yasemin Akçagüner
Date and Time:
Location: Private apartment, 200 West 119th Street, 10027 New York.
Subject: Preparing the amounts
Yasmine Akçagüner, a fellow PhD student in History, living in a street adjacent to mine, has offered to lend me her oven and a hand in preparing the dough. This meant having to carry my bowl of sourdough (covered with another bowl and cloth) outside. I am not sure if this has any effect on the dough.
11:30 am I reread the recipe to make sure I knew which steps to take. See a transcription of the recipe below the image.
| Image URL: |
|---|
|
Transcription:
Take a gallon of fine flour, and a pint of good new ale barn or yeast, and put it to the floor, with the whites of six new laid eggs well beaten in a dish, and mixt with the barn in the middle of the flour, also three spoonfuls of fine salt, then warm some milk and fair water, and put to it, and make it up pretty stiff, being well wrought and worked up, cover it in a boul or tray with a warm cloth till your be hot, then make it up either in rouls, or fashion it in little wooden dishes and bake it, being baked in a quick oven, chip it hot.
Ingredients and tools required for the recipe:
| Tools for bread making | What I purchased/used | Comments |
|---|---|---|
| Bowl or plastic box | I used two plastic bowl that I had at home | |
| Spoon | Tablespoon | The author doesn’t specify what kind of spoon and I haven’t been able to establish which spoon to use. They may have had different sizes and kinds of spoons in the 17th century. I decided the salt was probably for the taste of the bread and the amount of salt wouldn’t matter so much when making bread molds. I settled for a tablespoon |
| Something to “beat” the egg whites with | Fork | I figured they probably didn’t have whiskers in the 17th century. |
| Cloth or lit (for covering the dough) | Cotton cloth | |
| Scale or measuring cup (for measuring the amount of water and flower) |
|
|
| Dish |
|
|
| Something to warm the milk & water in |
|
|
| Oven | Electric oven | I am aware that this might have an effect on the preparing of the bread, given that the oven of early modern practitioners would probably differ in temperature. |
| Ingredients for bread making | What I purchased/used | Comments |
|---|---|---|
| Gallon of fine flower | Heckers Unbleached Forever All Purpose Flour | Through internet research I found this would probably be around 16 cups (!) |
| A pint of good new ale barn or yeast | Sourdough Starter kit, from the M&K team | Through online research I found this is probably be around 2 cups of yeast. |
| Whites of 6 new laid eggs well beaten in a dish | Amish Country, Organic Eggs, Brown Eggs, Grade A large | I was not able to get “new laid eggs”, so I bought fresh organic ones. The size of these eggs (and hence the quantity of egg white) may differ from those used in early modern times. |
| 3 spoonfuls of fine salt | Plain kitchen salt (not sure which brand, as my roommate bottled it already) | |
| Some milk | Low temperature pasteurized | Early modern milk was probably not pasteurized. Unfortunately, I could not find unpasteurized milk, so I settled for low temperature pasteurized milk. |
| Fair water | Tap water | Tap water might influence the end-product due to the chemicals in the water. |
| A baking tray to put the bread on while in the oven | ||
| Wax paper for putting in the baking tray |
Selecting Amounts:
After doing some internet research, I found that a gallon of flower would be about 16 cups. This recipe was probably intended for a large group of people, or for make various batches of bread from. I chose to work with less. I tried finding out how much flower an average sized bread at that time would have required, but did not succeed.I thus checked a modern-day bread recipe and used it as a comparative (although I realize this will make my reconstruction less authentic).
I found a recipe for sourdough bread making on the same website that I used for
learning how to feed my starter. This recipe uses 3-⅓ cups of flower. I decided to use 4
cups (for easier Math).
As I divided my flour by four, I did this for the other ingredients as well. I wanted to make two batches of bread, so decided to change the amount of egg-whites in the second trial, to see what it would to do to the texture of the bread (I reasoned that egg-whites normally make a something fluffier).
The recipe calls for “some milk and fair water”. As the author does not specify the amount, I chose to use water and milk by discretion, and see how much I would need in the process of making the dough.
| Original amount | Reconstruction, Trial 1 | Reconstruction, Trial 2 |
|---|---|---|
| Gallon (16 cups) of fine flower | 4 cups of flour | 4 cups of flour |
| A pint (2 cups) of good new ale barn or yeast | ½ cups sourdough starter | ½ cups sourdough starter |
| Whites of 6 new laid eggs well beaten in a dish | 1-½ egg whites | 2 egg whites |
| 3 spoonfuls of fine salt | ¾ tablespoon of salt | ¾ tablespoon of salt |
| Some milk | ¼ cup | by discretion |
| Fair water | ¾ cup | by discretion |
Name: Celine Camps
Date and Time:
Location: Private apartment, 200 West 119th Street, 10027 New York.
Subject: Making the dough
Transcription:
“Take a gallon of fine flour, and a pint of good new ale barn or yeast, and put it to the floor, with the whites of six new laid eggs well beaten in a dish, and mixt with the barn in the middle of the flour, also three spoonfuls of fine salt, then warm some milk and fair water, and put to it, and make it up pretty stiff, being well wrought and worked up, cover it in a boul or tray with a warm cloth till your oven be hot, then make it up either in rouls, or fashion it in little wooden dishes and bake it, being baked in a quick oven, chip it hot.”
We mixed 1-½ egg whites in a semi-deep plate with a fork until we thought it was ‘well beaten’
We put four cups of flour on the table.
We made a hollow in the flour and added :
- ½ cup of starter
- 1-½ egg whites
- ¾ tablespoon of salt(see image)
We mixed it all together. It was still very dry and needed liquid in order for the flour to form a ball of dough.
We mixed ¾ cup of water and ¼ cup of milk and briefly warmed it up on the stove (in a pan). We reasoned that “some milk and fair water” meant more water than milk and decided to start with ¾ cups of water and ¼ cups of milk and add more, if needed (i.e. by discretion).
We poured the warm milk-water mixture gradually over the flour (in a hollow we created). Everytime the liquid had been absorbed by the flour mixture, we poured in some more.
The dough was really sticky (see image). My (Celine’s) mom always taught me that dough is ready when it doesn’t stick to your hands or the table anymore. Although we didn’t know if that rule applied to early modern dough as well, we figured it would have made sense to apply it nevertheless. Having to move the sticky mixture into a bowl for rising would have been impossible.
We thus added about half a cup more flour
The dough was now no longer sticking to our hands (or the table).
We knead the dough by folding it and throwing it on the table (as my mom always did when she made bread -- according to her, this would allow air to go in, making it puffy).
We figured this might have been what the author of the recipe meant with ‘well wrought and worked up’. We did so for about 5-10 minutes.
| Image URL: |
|---|
 |
| Image URL: |
|---|
 |
| Image URL: |
|---|
 |
Name: Celine Camps
Date and Time:
Location: Private apartment, 200 West 119th Street, 10027 New York.
Subject: Letting the dough rise
We shaped the bread in a ball and put it in a bowl, covered with a damp linen cloth. We had a brief discussion about the meaning of “warm cloth”. Does the author mean warm as in ‘thick’ (less air going through and thus of a more isolating nature) or warm as in temperature of the cloth? Moreover, in case of the latter, does he mean warm being heated by the warmth of the stove, or warm being damp (as a result of warm water)? I interpreted it as meaning the latter, on the basis of my own experience with baking bread. I know yeast responds well to damp/warm areas. So we dampened the cloth with warm water and covered the bowl with it.
As per instructions, we had to let the bread rise “till our oven be hot”. We realized that it would be difficult to know how long and at which temperature we would have to set the oven. How long would it have taken for early modern ovens to be hot? This might in part depend on the kind of oven that was used for baking bread.
As we didn’t have much time to do proper research on this, we chose to follow the light of Yasemin’s oven as an indicator. As most modern recipes for making bread require a temperature of about 350-400 Fahrenheit, we decided to go with that and set our oven at 350 Fahrenheit.
| Image URL: |
|---|
 |
Name: Celine Camps
Date and Time:
Location: Private apartment, 200 West 119th Street, 10027 New York.
Subject: Baking the bread
The oven light switched off after about 20 minutes, so we took out our dough, which hadn’t risen very much, but since we didn’t know if this was necessarily a good or bad thing (we didn’t know what the dough was supposed to look like according to the standard of the early modern recipe), we decided to put it in the oven nevertheless.
We placed a piece of wax paper on a baking tray and placed the dough on top. We placed the tray at the lowest position possible.
The recipe equally didn’t explain as to when the bread would be ‘ready’ to be taken out of the oven. We thus kept an eye on it and take it out once the crust was golden-brown. In the meantime we started cleaning our tools in preparation for trial 2.
We took the bread out of the oven when it was golden brown, which was after exactly 1 hour (at 2 pm).
| Image URL: |
|---|
 |
Name: Celine Camps
Date and Time:
Location: Private apartment, 200 West 119th Street, 10027 New York.
Subject: Making the molds
RECIPES FOR BREAD MOLDING IN BNF MS. 640:
Folio 140v_1
Transcription Normalized French (TCN)
<div>
<id>p140v_1</id>
<head>
Pour gecter en <m>soufre</m></head>
<ab>
Pour gecter nettement en <m>soufre</m>, acoustre la <m>miette de<lb/>
pain</m> soubs le brasier comme tu sçais. Moules en ce que<lb/>
tu veulx & laisse seicher & tu auras ton ouvrage fort net.</ab>
<ab>
<margin>left-top</margin>
Essaye le <m>soufre</m>,<lb/>
passé par la <m>cire</m><lb/>
fondue, pource qu'il<lb/>
ne s'enflamme plus<lb/>
& ne faict plus d'oeillets.</ab>
</div>
Translation (TL)
<id>p140v_1</id>
<head>To cast in <m>sulfur</m></head>
<ab>
To cast neatly in <m>sulfur</m>, arrange the pith of <m>bread</m> under the brazier, as you know. Mold whatever you want into it & let it dry & you will have very
neat work.</ab>
<ab>
<margin>left-top</margin>
Try <m>sulfur</m> passed through melted <m>wax</m>, because it will no longer ignite & and make eyelets.</ab>
</div>
Folio 140v_2
Transcription Normalized French (TCN)
<div>
<id>p140v_2</id>
<head>
Mouler et rapetisser une grande<lb/>
figure</head>
<ab>Moule le avecq <m>mie de pain</m> venant du <tl>four</tl> ou co<exp>mm</exp>e la<lb/>susdicte, & en se seichant il s'apetissera, & par consequent<lb/>
la medaille que tu y gecteras. Tu <del>luy></del> peulx, par ce<lb/>
moyen, en allongeant ou eslargisseant la <m>miette</m> emprainte,<lb/>
varier la figure & d'un visage en fayre plusieurs<lb/>
tous divers. Le <m>pain</m> venant du <tl>four</tl> est meilleur. Et<lb/>
celuy qui est deulx fois recuit se retire dadvantage. Tu<lb/>
peulx gecter le <m>soufre</m> sans laisser seicher l'empraincte<lb/>
du <m>pain</m>, si tu la veulx mouler aussy grande qu’elle est.<lb/>
Mays si tu la veulx laisser apetisser, fais la seicher<lb/>
ou plus ou moings.</ab>
</div>
Translation (TL)
<div>
<id>p140v_2</id>
<head>Molding and shrinking a large shape</head>
<ab>
Mold it with the pith of bread just out of the oven, or like that aforementioned, & in drying out it will shrink & consequently so will the medal that you will cast. By these
means - lengthening out or enlarging the imprinted bread - you can vary the shape & from one face make several different ones. The <m>bread</m> straight from the
oven is best. And the one which has been heated twice contracts more. You can cast <m>sulfur</m> without letting the imprint on the <m>bread</m> dry, if you want to
cast it as large as it is. But, if you want to let it shrink, let it dry to a greater or lesser extent.</ab>
</div>
Folio 156r_1
Transcription Normalized French (TCN)
<div>
<id>p156r_1</id>
<head>Mouler prompteme<exp>n</exp>t et reduire un<lb/>
cave en relief</head>
<ab>Tu peulx empraindre de <m>cire colorée</m> le relief d'une<lb/>
medaille, & tu auras un cave dans lequel tu pourras gecter<lb/>
en noyau un relief <add>de ton sable</add>, sur lequel tu feras un cave de <m>plomb</m><lb/>
ou d'<m>estain,</m> dans lequel tu gecteras un relief de <m>cire</m>.<lb/>
Et puys, sur ceste <m>cire</m>, tu feras ton <tl>moule</tl> en noyau cave<lb/>
pour y gecter le relief d'<m>or</m> & d'<m>argent</m> ou tel aultre<lb/>
<m>metal</m> qu'il te plaira. Mays pour advancer besoigne,<lb/>
si tu as haste, fais le premier empraint & cave de <m>mie de<lb/>
pain</m> preparée co<exp>mm</exp>e tu sçais, qui moulera fort net. Et là<lb/>
dedans gectes y de la <m>cire fondue</m>, qui te rendra un beau<lb/>
relief sur lequel tu feras ton noyau.</ab>
</div>
Translation (TL)
<div>
<id>p156r_1</id>
<head>Quickly molding and reducing a relief[a] to a hollow <x>mold</x></head>
<ab>Make an impression in colored wax of the relief of your medal. And you will get a hollow mold, in which you can cast en noyau[b] a relief in sand. In this, you will
cast your hollow in lead or tin. In this, you you will cast your wax relief. And then on this <m>wax</m>, you will make your hollow moule en noyau, in order to cast in it
the relief in <m>gold</m> or <m>silver</m> or any other metal you would like. But to make this process go faster, if you are in a hurry, make the first impression and the
first hollow out of the inside portion of the <m>bread</m> loaf[c], prepared as you know, and which will cast neatly. And inside this, cast in the melted <m>wax</m>
which will give you a nice relief on which you can make your noyau.</ab>
</div>
MAKING THE MOLDS
As the author-practitioner considers the bread just out of the oven the best for molding, we did not wait for the bread to cool off.
The recipe instructs us to use the ‘pith’ of the bread. We assumed this was the inner part of the bread.
We thus cut the bread in half. However, although the color looked nice, the crust was too hard and it took a lot of bodily effort to cut through it. We realized leaving the bread in for an hour might have been too long. Although we also reasoned it might be difficult to find the cause of the hard crust (the temperature might have been too high, there may not have been enough water/milk, egg whites, yeast, etc. in it).
This in itself pointed to the experimental nature of reconstructions. Gaining a better understanding of which variables need to be altered to create a desired effect or, which variables collectively produced a certain result, demands and invites experimentation and experience. That is, we would have to try numerous variations of the recipe in order to find out what might have caused the bread to become so dry (accepting that we might never find out).
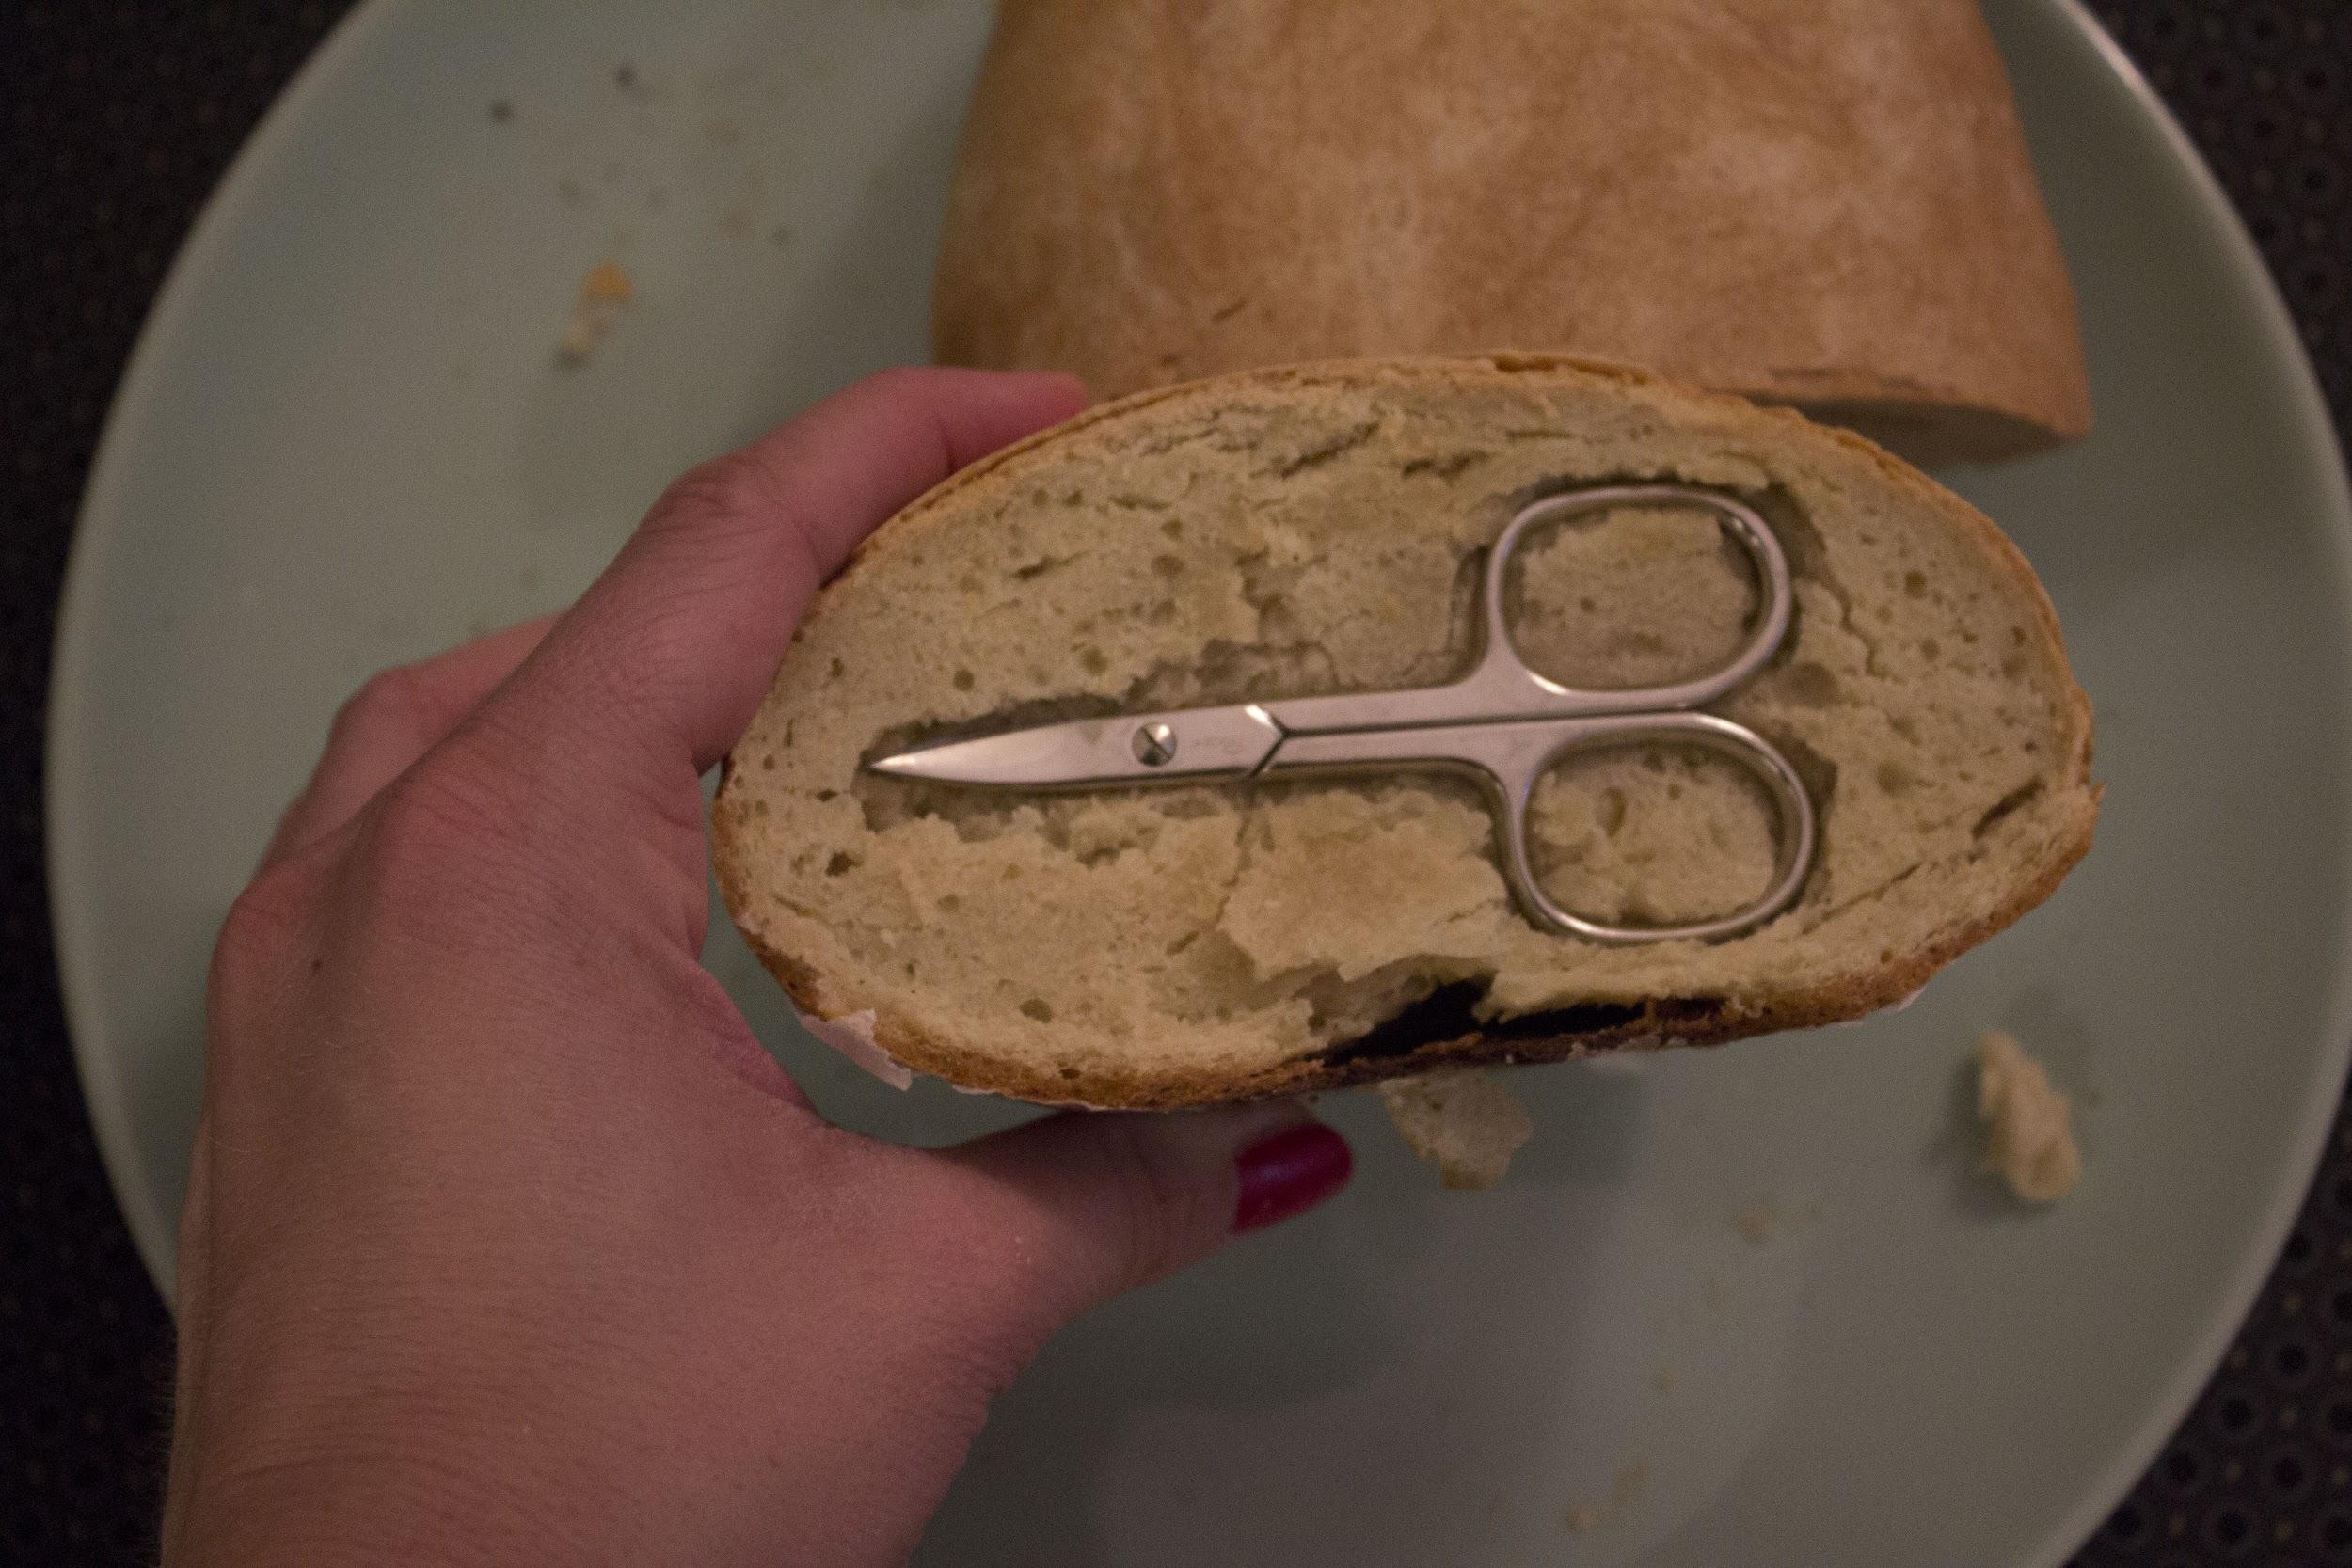
The inside contained quite a lot of air pockets. We used one side of the mold to press in a pair of scissors (the object we chose to mold -- for lack of something better).
We felt it was rather spongy and it bounced back, not really taking on the shape of the scissors properly.
We noticed that the bread dried rather quickly once taken out off the oven.
This is probably why the author practitioner advises to use bread directly from the oven.
It is thus through making the molds—as opposed to reading about how to make them— that I came to better understand the recipe and the author’s instructions.
We thus decided to try a different technique with the other side of the bread (before it would dry out too much).
Instead of directly pressing the object in the bread, we decided to try and scoop out the ‘pith’ of the bread and use that as the mold within which to press our object.
This turned out to be impossible (at least with bread having just come out of the oven) as the bread was still very hot, causing us to burn our fingers (see how red my hands are in the image below).
This is why we reasoned the author-practitioner probably didn’t mean for molds to be made in this manner.
We let the scissors sit in the bread for a while and see if it would take on its shape better after a while. In the meantime we started making preparations for trial two.
After about 5 minutes we took the scissor out of the first mold. The scissors were lying on the mold’s surface, and the pit had not really taken in any clear imprint of the object.
The bread was too dry and not absorbent enough. We also thought there were too many air pockets, which probably ‘ruined’ the imprint and its details.
| Image URL: |
|---|
 |
| Image URL: |
|---|
 |
| Image URL: |
|---|
 |
REFLECTIONS
Our first experiment made us realize that although the golden-colored bread might have tasted (and looked) good, it was not suitable for our purposes (i.e. as the basis for making molds).
This meant that we could not rely on the crust or taste of the bread as an indication of what ‘good’ bread was (in the context of bread molding) and when it should be taken out of the oven.
Yet we are so used to thinking about bread (and good bread) in terms of food and thus the way it looks (golden brown, crispy crust, not too dense, but rather puffy and with air pockets), and feels/tastes in our mouths, that it is easy to forget that
1. Our pallets might have changed over time and early modern individuals might have had
different preferences and thoughts on what ‘good’ bread looked and tasted like. Since the
author practitioner does not explain what kind of texture would be most suitable for the
bread, it thus seems reasonable to assume that the natural texture of early modern bread
(i.e. how it was commonly prepared) might have lend itself very well for molding purposes.
2. Bread was used for different purposes in the early modern period and was not merely a
source of nutrition. This is reflected by the various uses of bread in the manuscript.
Making a good mold thus required us to think about bread beyond its nutritional purposes and instead to imagine what other kind of qualities would have rendered it suitable for molding.
Put differently, this meant we had to think of bread in terms of it being used for molding and determine what good bread was within that specific context.
Focusing on the crust, would not be very useful in that case.
Yet if not for the crust, how else were we to determine what good bread was?
Name: Celine Camps
Date and Time:
Location: Private apartment, 200 West 119th Street, 10027 New York.
Subject: Making the dough, trial 2
We chose to use 2 egg whites this time, instead of 1-½, to see if it this would create less air pockets and create a more dense texture and even surface. We beat them in a semi-deep plate with a fork until we believed they were ‘well beaten’.
We put 4-½ cups of flour on the table (having learned in our first trial that we needed more flour).
We made a hollow in the flour and added:
- ½ cup of starter
- 2 egg whites
- ¾ tablespoon of salt
We mixed it all together. As before, it was still very dry and needed liquid in order for the flour to form a proper ball.
We mixed ¾ cup of water and ¼ cup of milk and briefly warmed it up on the stove (in a pan).
We poured the warm milk-water mixture gradually over the flour (in a hollow we created). Every time the liquid had been absorbed by the flour mixture, we poured in some more.
Probably because of the extra ½ egg whites, the dough was still too sticky and needed more flower. So we added about half a cup.
The dough was now no longer sticking to our hands (or the table).
We knead the dough by folding it and throwing it on the table again. We did so for about 5-10 minutes
Name: Celine Camps
Date and Time:
Location: Private apartment, 200 West 119th Street, 10027 New York.
Subject: Letting the dough rise, trial 2
We let the dough rise for about 1.5 hours (in the meantime we had lunch--an omelet made from the eggs yolks we didn’t use in our recipe).
It still hadn’t risen a lot. There probably wasn’t a sufficient amount of yeast in the dough.
However, more yeast would probably also cause more air pockets, which we believed would interfere with and ruin the shape and details of an object’s imprint. Hence we didn’t think it was necessarily a bad thing that the dough didn’t rise--perhaps it would create a more even and smooth texture.
Name: Celine Camps
Date and Time:
Location: Private apartment, 200 West 119th Street, 10027 New York.
Subject: Baking the bread, trial 2
We set the oven temperature a bit higher this time (at about 400F), but chose not leave the bread in as long as in trial 1. We hoped this would allow for a sufficient crust to be formed which would keep the bread in one piece when picking it up, while leaving the inside (the pith) still moist enough to be absorbent to an object (without too runny and thus swallowing it whole).
Key to this experiment was therefore no longer the crust, like it had been before, but rather the pith of the bread. How were we to make sure the texture of the pith was in fact suitable for molding without cutting it open and running the risk of drying it out? We recalled that bakers sometimes stick chopsticks in their cakes to check if they’re done. If there is no cake batter sticking to the chopsticks, it means the cake has the right texture and can be taken out of the oven. We decided to make use of that trick (see the small holes in the bread in the picture below) and take the bread out once the dough would no longer stick to the chopsticks.
After about 20 minutes we checked the inside of the bread. Dough still stuck to the chopsticks, so we left it in the oven a bit longer.
After another 10 minutes had passed (total: 30 minutes), we stuck the chopsticks back in again. No dough stuck to the sticks. We thus took the bread out of the oven.
The bread was really white.
| Image URL: |
|---|
 |
Name: Celine Camps
Date and Time:
Location: Private apartment, 200 West 119th Street, 10027 New York.
Subject: Making the molds, trial 2
Once we had cut the bread, it turned out the pith was still very runny (we probably hadn’t stuck our chopsticks in deep enough), so it probably should have stayed in the oven a bit longer (we wrote this down as a reminder for our next attempt). However we decided to give the molding a go nevertheless. Having learned from our previous trial—and hence from experience—that the bread dried pretty quickly, we hoped the inside would solidify a bit after having cooled off.
We saw few to no air pockets, so we assumed the ratio of ingredients was good.
We pressed a pair of scissors in the pith of the bread.
After a few minutes, we noticed the bread had swallowed my entire scissors. The texture of the bread was too moist (i.e. too absorbent to an object) and was thus not suitable for molding—we probably should have left it in longer (or changed the temperature).
We realized however, that the outer regions (for lack of a better word) of the bread, might be less runny (because they are not as thick), so we cut of a large slice at the outer part of the bread and pressed another pair of scissors into them (see image with red )
This worked remarkably well.
We left it in for about 20 minutes.
After trial 1 & 2 we thus ended up with three different kind of molds (see image):
Mold 1: Did not take on an imprint very well. We had to use quite a lot of pressure to get an imprint of some sort and only the contours of the scissors were visible. Too many air pockets and a too dry and not moist enough texture prevented the bread from taking on any details.
Mold 2: Too runny. Too absorbent to anything. Swallowed the entire object. Impossible to use as a mold as it would not have any fixed contours (later added comment: even after several hours, the bread was still damp and soft).
Mold 3: Turned out really well. Few to no air pockets, which allowed for clear outlines/contours of the scissors. All lines and details visible. Texture perhaps a bit too dry for the scissors to be pressed further down into the bread -- the imprint/hollow is rather shallow. Any liquid that would be poured in would probably run over.
| Image URL: |
|---|
 |
| Image URL: |
|---|
 |
| Image URL: |
|---|
 |
| Image URL: |
|---|
 |
| Image URL: |
|---|
 |
| Image URL: |
|---|
 |
| Image URL: |
|---|
 |
Name: Celine Camps
Date and Time:
Location: Private apartment, 405 West 118th Street, 10027 New York.
Subject: Making the dough and letting it rise, trial 3
I chose to make another loaf as I wanted to have at least one good and not too shallow mold to work with.
I chose to use the same amount of ingredients as in trial 2, but decided I would leave the bread in the oven a bit longer--so it wouldn’t swallow my scissors anymore.
I let the dough rise for 30 minutes
Interestingly, I no longer had to look at the instructions of the early modern recipe. After having gained experience in making bread, I no longer needed instructions. Making the bread became more like a sort of routine.
REFLECTIONS
In the beginning I focused heavily on the recipe’s instruction and I was measuring the ingredients carefully. E.g. making sure I used enough egg-whites, enough flower, not too much milk. In other words, the textual instructions were central to my ability to move forward in the process.
But over time, after having gained more experience in making bread, those instructions became less important. Rather central to the process was now my own body.
For example, I referred to my own memory of what the dough felt like in the last trial, to determine whether or not I should add more or less flower, if it required water or perhaps another egg white.
I thus began to think of my own body as a repository of memory and of being capable of storing sensory memories of materials, their properties, their textures, etc. E.g., how does dough feel on my hands and fingers when it is ‘ready’ to be put aside and to let rise? Is it sticky? It is malleable? How does it sound when I slap it onto the table? How does it feel when I slide the chopstick into the bread, is there resistance or does it go in smoothly?
This also made me think differently about some of the entries in the manuscript where the author refers to bread as a comparative material (as opposed to being an ingredient). For example:
fol. 29r: “And knead it as if you wanted to make <m>bread</m>”
fol. 29r: “you perceive that it has enough body & is as firm as <m>bread dough</m>”
fol. 114r: “Then strongly separate the molds as if you wanted to tear <m>bread</m> apart”
fol. 129v: “then dry them into an oven as hot as when <m>bread</m> has been taken out.”
fol. 129v: “promptly dry them in an oven as warm as when <m>bread</m> has been taken out”
The ability for any practitioner to follow this set of instructions is fundamentally dependent on his familiarity with the process of making bread, bread dough, tearing bread, using an oven, etc.
Most importantly, it is not a fixed set of instructions, but rather the materiality of the bread itself and the bodily memories of it (as experienced through the practitioner’s own bodily engagement with the material) that becomes central to understanding and knowing, when and how to move forward in the experiment.
Your bodily engagement with the material, and most importantly the sensory memory of it, as experienced through and subsequently stored in your body, is thus the guiding principle.
What went along with this was the fact that I didn’t write much down either. Whereas in the first two trials I was jotting down every single gram and change of oven temperature, I had now become more confident in relying on my own judgement for knowing if the dough or the bread was ready.
It would be interesting to reflect more on the act of note taking and its relation to the amount of experience one has in executing a certain experiment.
Name: Celine Camps
Date and Time:
Location: Private apartment, 405 West 118th Street, 10027 New York.
Subject: Baking the bread, trial 3
I put the oven on 400F
I used my own oven this time (which has been fixed) so it might well be that it might work differently from Yasemin’s oven.
I put the bread in the oven
I checked with the chopsticks and noticed that it took longer for the bread’s texture to be ‘ready’ for molding. Yasemine’s oven was probably hotter.
I took the bread out after 45 minutes.
The bread looks pale and without any color, and is probably undercooked. Something we would not serve as bread to anyone nowadays.
| Image URL: |
|---|
 |
Name: Celine Camps
Date and Time:
Location: Private apartment, 405 West 118th Street, 10027 New York.
Subject: Making the molds, trial 3
I cut four slices off the bread.
The texture seemed perfect. Little to no air pockets, spongy enough to absorb a shape, but not too much to swallow it entirely.
I use my old contact case this time as an object to mold.
The bread took on not only the shape and contours of the case, but even the pattern, the ridges and its details. I was quite pleased with the result.
| Image URL: |
|---|
 |
| Image URL: |
|---|
 |
| Image URL: |
|---|
 |
Name: Celine Camps
Date and Time:
Location: Private apartment, 405 West 118th Street, 10027 New York.
Subject: Making the dough, letting it rise and baking it, trial 4
While bread number 3 was in the oven, I had prepared another batch of dough
I put the bread in the oven immediately after I had taken loaf number 3 out.
After a few minutes, I realized that I forgot to put the dough on a baking tray and had put directly onto the roster instead. When I opened the oven, the dough had started dripping/melting right through. I had to scrape it out of the oven. As I was insistent on making another mold and didn’t want to start from scratch, I scooped all the dough out of the oven with a spatula and reshaped it into two small loaves. I then placed both on the baking tray.
I took it out after about one hour.
The two loaves were not as nicely shaped anymore, but I cared more about the texture of the pith.
I cut off two slices -- this was all I could use as these loaves were too small for making proper molds.
There vain-like tears and cracks in the bread (perhaps as a result of the dripping and remolding) and I was concerned it would not be usable for making molds.
I pressed my contact case in and held it down a few minutes.
Interestingly, these turned out to take on the shape and detail of the lens case very well.
I removed the contact case
I removed a little of the crust and bread on top os as to create a vent.
I then put the molds aside on a plate to dry.
| Image URL: |
|---|
 |
| Image URL: |
|---|
 |
| Image URL: |
|---|
 |
| Image URL: |
|---|
 |
| Image URL: |
|---|
 |
Name: Celine Camps & Lan Li
Date and Time:
Location: Havemeyer Hall, Chandler 260, Columbia University, NY, NY 10027
Subject: ‘Repairing’ the molds
Tools and Materials:
Plasticine (non hardening molding clay)
Tape
Bread molds
Today it was time to cast beeswax and sulfur into our molds.
I had brought 6 molds: 4 single piece molds and one two-piece mold. Unfortunately the last mold of the scissors had started to mold (no pun intended) and it had begun to smell, so I had to throw it out.
I thus proceeded with 4 molds and 1 double sided mold, each with an imprint of my contact case.
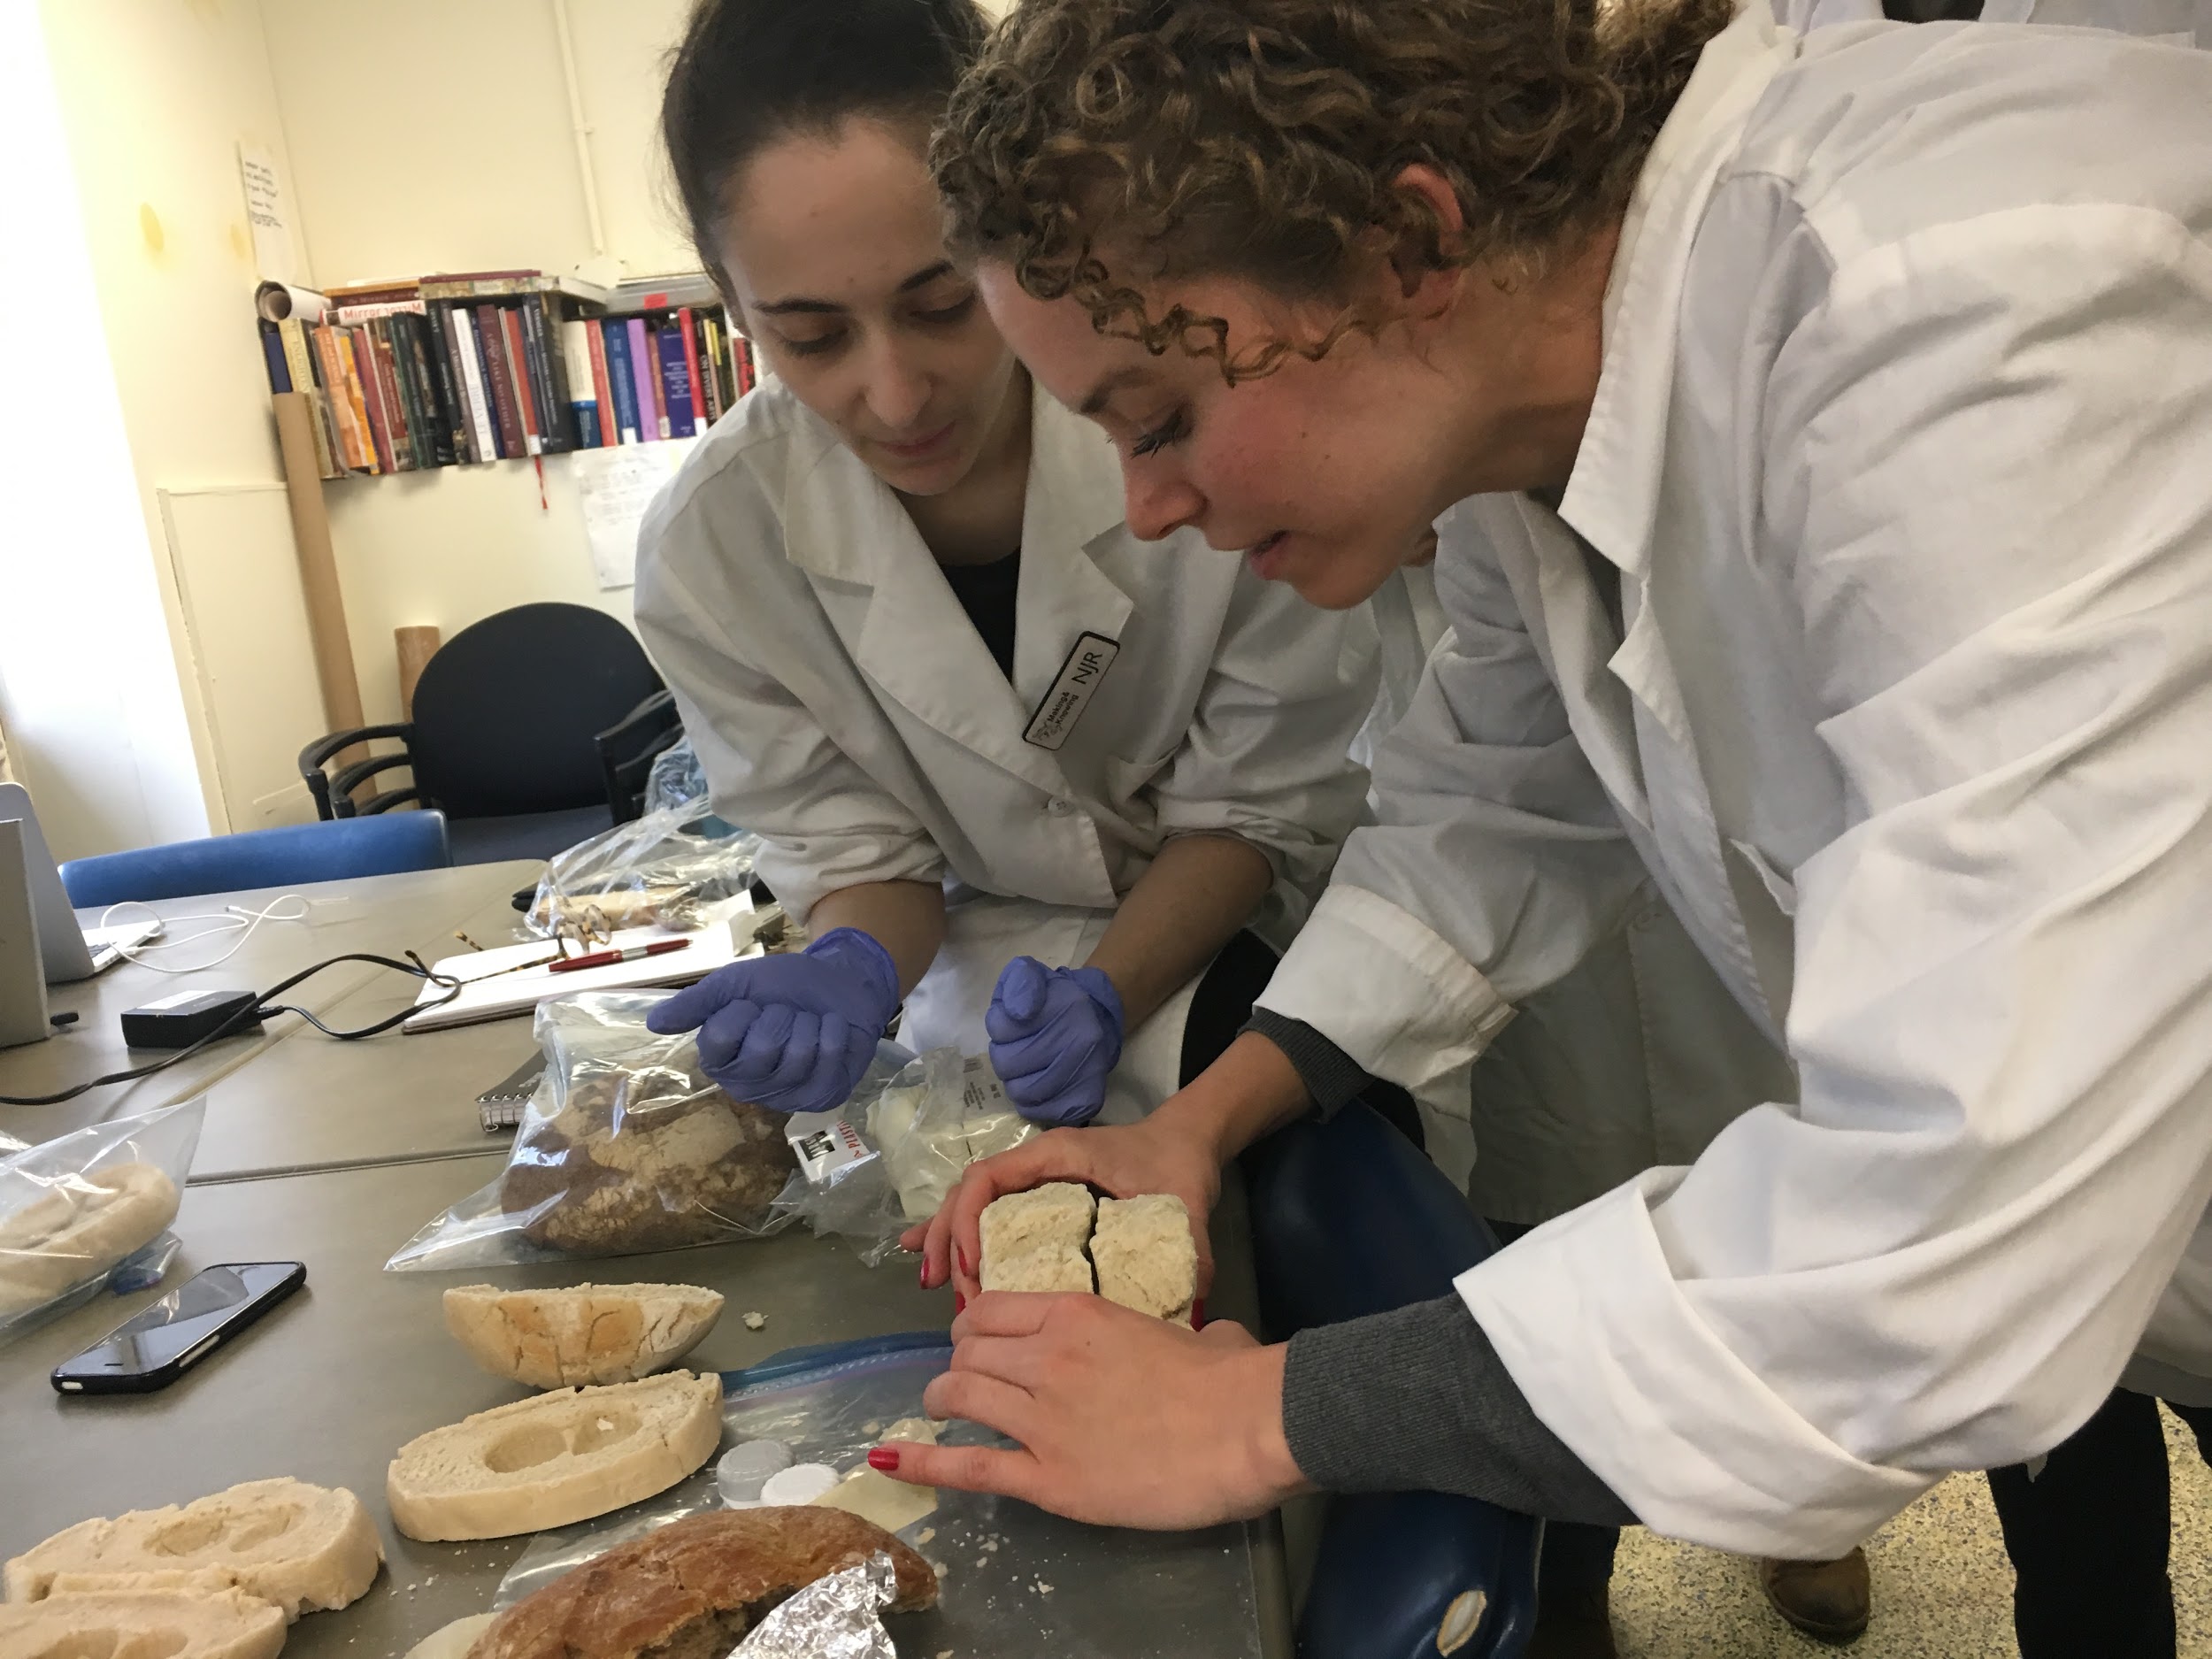
We had to find a way to attach the two sides of the two-piece mold together. Because my bread mold was a bit wonky on the sides, we used non-hardening molding clay (plasticine) to elevate the sides and piece the mold together with the expert help of Naomi. We also used the plasticine to seal the holes in the bread mold.
It was difficult to know how much plasticine to use or if would hold and prevent the wax/sulfur from running out.
| Image URL: |
|---|
 |
| Image URL: |
|---|
 |
| Image URL: |
|---|
 |
Name: Celine Camps & Lan Li
Date and time:
2018.10.01, 1:30 pm
Location: Havemeyer Hall, Chandler 260, Columbia University, NY, NY 10027
Subject: Adding linseed oil
Materials:
linseed oil
bread molds
Tools:
brush
Process:
Then we added linseed oil to all of the molds (except for the one we would pour sulfur in)--hoping this would enable us to remove the casts more easily from the molds.
We were not sure exactly how much oil to use. As with so many other aspects in this process, we had to employ a trial and error approach.
It was also hard to measure how much oil we actually used and to write this down for a possible repeating of the process.
| Image URL: |
|---|
 |
| Image URL: |
|---|
 |
Name: Celine Camps & Lan Li
Date and time:
2018.10.01, 1:45 pm
Location: Havemeyer Hall, Chandler 260, Columbia University, NY, NY 10027
Subject: Taping and sealing the two-piece mold
Tools and Materials:
Plasticine (non hardening molding clay)
Tape
Bread molds
Process:
Then we sealed up the remaining gaps with clay and wrapped up the bread like a mummy with yellow tape. We kept a vent (hole at the top) to pour the wax in. We wondered about what they would have used in the sixteenth century to keep the molds together and prevent sulfur or beeswax from running out.
| Image URL: |
|---|
 |
| Image URL: |
|---|
 |
Name: Celine Camps & Lan Li
Date and time:
2018.10.01, 1:55 pm
Location: Havemeyer Hall, Chandler 260, Columbia University, NY, NY 10027
Subject: Casting with sulfur and beeswax
Tools:
Hot plate
Tin can
Chopstick (for stirring)
Gloves
Materials:
Bread molds
Beeswax
Sulfur
Process:
We decided to pour sulfur in to one of my single piece molds and use the other one and the two-piece mold for the beeswax.
Tillmann had to melt a new batch of sulfur
We poured the sulfur into one of my single piece contact case molds and put it aside to solidify
We then moved on to the beeswax station.
We had to melt a new batch of beeswax, which took about 15 minutes -- on a low heat.
It smelled like old churches.
We then poured the beeswax into the single piece mold. The remainder of the wax was used for the double piece mold. Nothing came running out and the beeswax stayed inside the mold. We were very pleased with that.
We put the molds aside to let everything solidify over night.
| Image URL: |
|---|
 |
| Image URL: |
|---|
 |
| Image URL: |
|---|
 |
| Image URL: |
|---|
 |
| Image URL: |
|---|
 |
| Image URL: |
|---|
 |
Name: Celine Camps
Date and Time:
Location: Havemeyer Hall, Chandler 260, Columbia University, NY, NY 10027
Subject: Removing the molds and revealing the castst
Moment of truth: today I could finally remove the molds from the cast (the cast have been resting for three days in total) and see the result.
The large part of my bread molds came of rather easily. I could tear off large chunks of bread with relative ease. I am not sure if this may be due to the bread’s texture--it was still fairly humid/moist (I deliberately undercooked the bread)--or if the linseed oil had anything to do with this. This would require multiple experimentations and variations of the casting.
| Image URL: |
|---|
 |
| Image URL: |
|---|
 |
| Image URL: |
|---|
 |
The tricky part, however, was to remove the remaining bread crumbs that stuck to the sulfur and the beeswax, so as to get a clean cast. This proved easier with the ones made of sulfur. Although this material was more brittle and prone to breaking (one of the two casts was too fragile and broke in half) than the casts made from beeswax, its hardness actually enabled me to remove the crumbs with a toothpick, without (noticeably) carving away the sulfur and thus adding a new and unintended pattern to the cast or removing/altering the existing one.
Although, in theory, the toothpick method could have worked for the beeswax casts as well, practice showed that this tool actually left carvings in the wax (because of the properties of the wax) and thus altered the end result. I therefore tried removing the bread crumbs by soaking the beeswax casts in water and by softly rubbing them of with my fingers, but it remained difficult to remove them all.
| Image URL: |
|---|
 |
| Image URL: |
|---|
 |
| Image URL: |
|---|
 |
The plasticine, although having kept the two piece mold together and preventing any wax from running out, stuck to the cast like gum and was almost impossible to remove (as you can see in the picture). It might be worth exploring alternative methods of sealing the molds.
| Image URL: |
|---|
 |
| Image URL: |
|---|
 |
| Image URL: |
|---|
 |
The two piece cast, although having exploded a bit on the sides (probably because the molds were not entirely aligned), turned out very well. It was a bit thicker than the original contact case, but nevertheless: it was a double sided relief cast.
Even though remaining bread crumbs hid part of the pattern and details imprinted in the casts, it was clear that both the wax and the sulfur had ‘preserved’ a lot of the original shape and I could still recognize my own contact case in each of them.
| Image URL: |
|---|
 |
| Image URL: |
|---|
 |
| Image URL: |
|---|
 |